Table of Contents
- What is AWS VPC?
- Why Do We Need a VPC?
- Key Components of AWS VPC
- What is a CIDR Block?
- What is a Subnet?
- Public Subnet vs Private Subnet
- What is an Internet Gateway?
- What is a Route Table?
- How Everything Connects Together
- Step-by-Step: Create Your Own VPC on AWS
- Common Mistakes Beginners Make
- Learning Outcomes
- What to Learn Next
1. What is AWS VPC?
AWS VPC (Virtual Private Cloud) is your own private, isolated section of the AWS cloud where you can launch and manage your cloud resources — like servers, databases, and applications — in a network that you fully control.
Think of it like this:
🏢 Imagine AWS is a massive office building with thousands of rooms. A VPC is your own private floor in that building. You decide who gets in, where the doors are, and which rooms connect to the outside world.
Before VPC existed, every resource you launched on AWS was sitting in a shared, public network — meaning anyone could potentially reach it. That was risky and unprofessional for production workloads.
AWS VPC solves that by giving you a dedicated, logically isolated network in the cloud where:
- You control the IP address ranges
- You decide what is public and what is private
- You define all traffic rules
- No other AWS customer can see or access your resources
2. Why Do We Need a VPC?
This is the question most beginners skip — and they shouldn’t.
Here is a real-world example to make it click:
Imagine you are building an e-commerce website. Your application has three layers:
| Layer | Component | Should it be public? |
|---|---|---|
| Frontend | Web server (Nginx) | ✅ Yes — users need to reach it |
| Backend | Application server | ⚠️ Maybe — only from web server |
| Database | MySQL / PostgreSQL | ❌ Never — must be private |
Without a VPC, everything would sit in the same open network. Your database would be exposed to the internet — a massive security risk.
With a VPC, you separate these layers into different network zones:
- The web server goes into a public subnet (internet accessible)
- The database goes into a private subnet (no internet access)
- Traffic between them is controlled by rules you define
This is why every production application on AWS uses a VPC. It is not optional — it is the foundation.
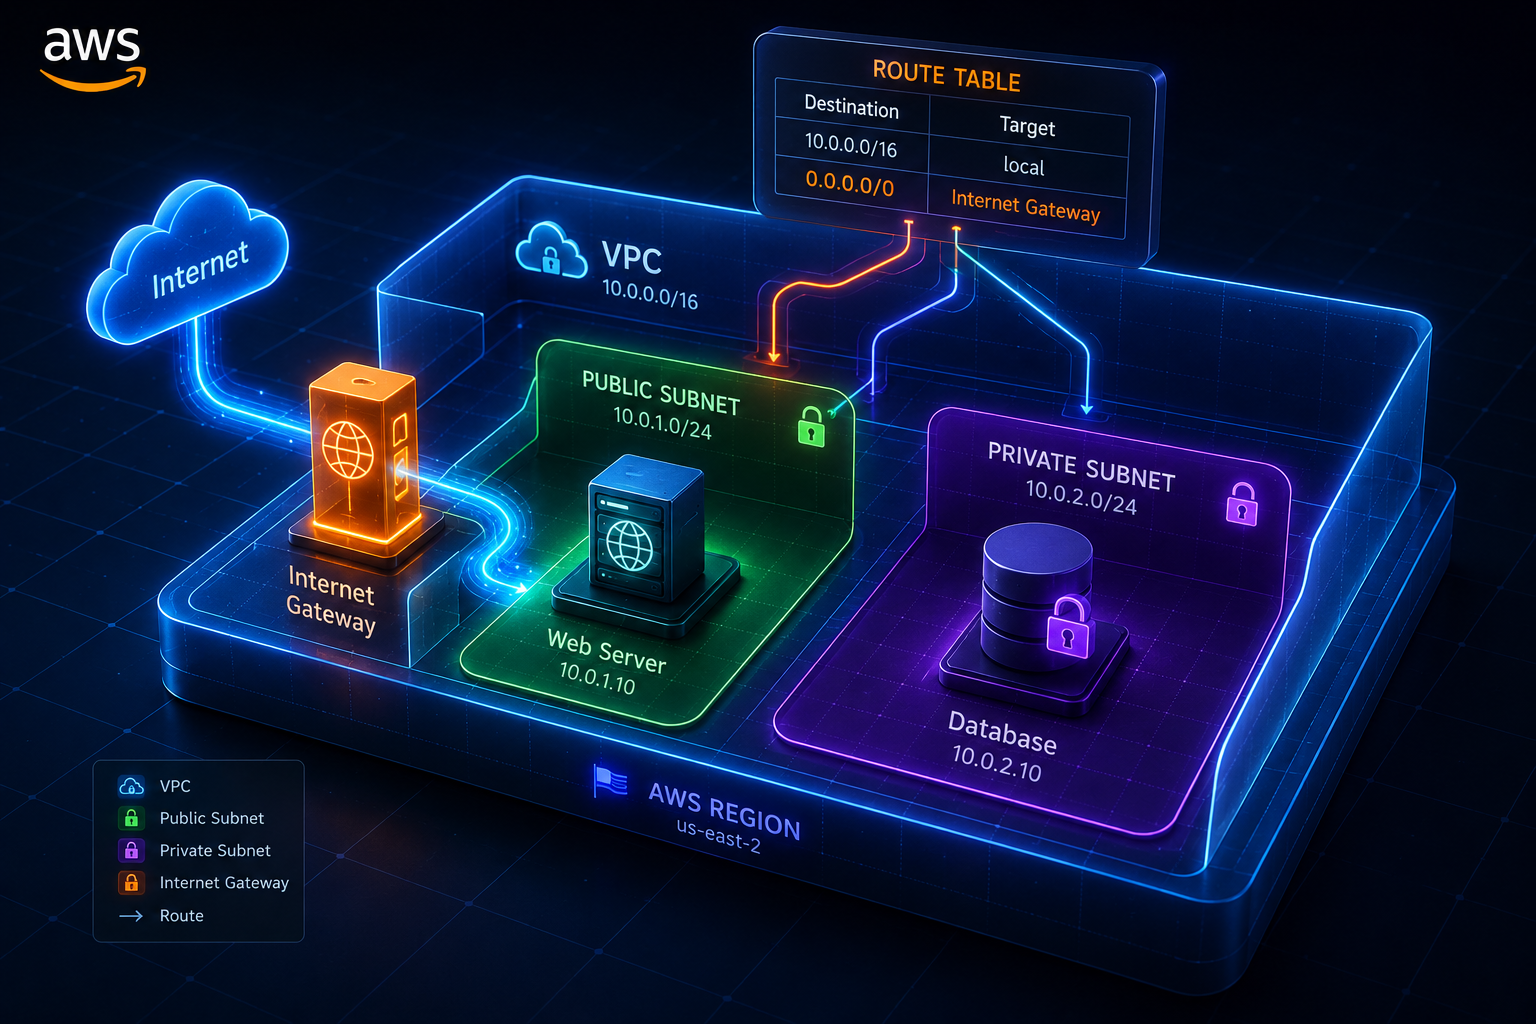
3. Key Components of AWS VPC
Before we go deeper, here is a quick overview of every component we will cover in this blog:
┌─────────────────────────────────────────────────────┐
│                     AWS VPC                         │
│                  (10.0.0.0/16)                      │
│                                                     │
│  ┌──────────────────┐   ┌──────────────────────┐   │
│  │  Public Subnet   │   │   Private Subnet      │   │
│  │  (10.0.1.0/24)   │   │   (10.0.2.0/24)       │   │
│  └────────┬─────────┘   └──────────────────────┘   │
│           │                                         │
│  ┌────────▼─────────┐                               │
│  │   Route Table    │                               │
│  │  0.0.0.0/0 → IGW │                               │
│  └────────┬─────────┘                               │
└───────────┼─────────────────────────────────────────┘
            │
┌───────────▼─────────────┐
│    Internet Gateway     │
└───────────┬─────────────┘
            │
        🌍 Internet
| Component | What It Does |
|---|---|
| VPC | The main private network container |
| CIDR Block | Defines the IP address range for the VPC |
| Public Subnet | A subnet connected to the internet via IGW |
| Private Subnet | A subnet with no internet access |
| Internet Gateway | The door between your VPC and the internet |
| Route Table | The traffic rulebook — tells packets where to go |
| Route Table Association | Links a subnet to a specific route table |
4. What is a CIDR Block?
CIDR (Classless Inter-Domain Routing) is simply a way to define a range of IP addresses. It looks like this:
10.0.0.0/16
Do not panic — it is simpler than it looks.
The number after the / tells you how many IP addresses are in the range:
| CIDR | Total IPs | Common Use |
|---|---|---|
10.0.0.0/8 |
16,777,216 | Very large enterprise networks |
10.0.0.0/16 |
65,536 | Standard VPC size ✅ |
10.0.0.0/24 |
256 | Subnets inside a VPC |
10.0.0.0/28 |
16 | Very small subnets |
For our VPC, we use 10.0.0.0/16 — which gives us 65,536 IP addresses to work with. That is plenty of room to create many subnets inside.
💡 Simple rule: The bigger the number after
/, the smaller the network./16is bigger than/24.
5. What is a Subnet?
A subnet (sub-network) is a smaller network carved out from inside your VPC.
Think of it like this:
🏙️ Your VPC is the entire city. A subnet is a specific neighborhood inside that city. Some neighborhoods are open to everyone (public). Some are gated and private.
Subnets let you:
- Organize your resources by function (web, app, database)
- Control security — apply different rules to different subnets
- Separate concerns — public-facing resources vs internal resources
Each subnet sits inside a specific Availability Zone (AZ) in AWS. For example, one subnet might be in us-east-2a and another in us-east-2b.
In our project, we create two subnets inside the same VPC:
VPC: 10.0.0.0/16
  ├── Public Subnet:  10.0.1.0/24  (256 IPs)
  └── Private Subnet: 10.0.2.0/24  (256 IPs)
They do not overlap. They share the same VPC but serve completely different purposes.
6. Public Subnet vs Private Subnet
This is the most important concept in AWS VPC networking. Let us break it down clearly.
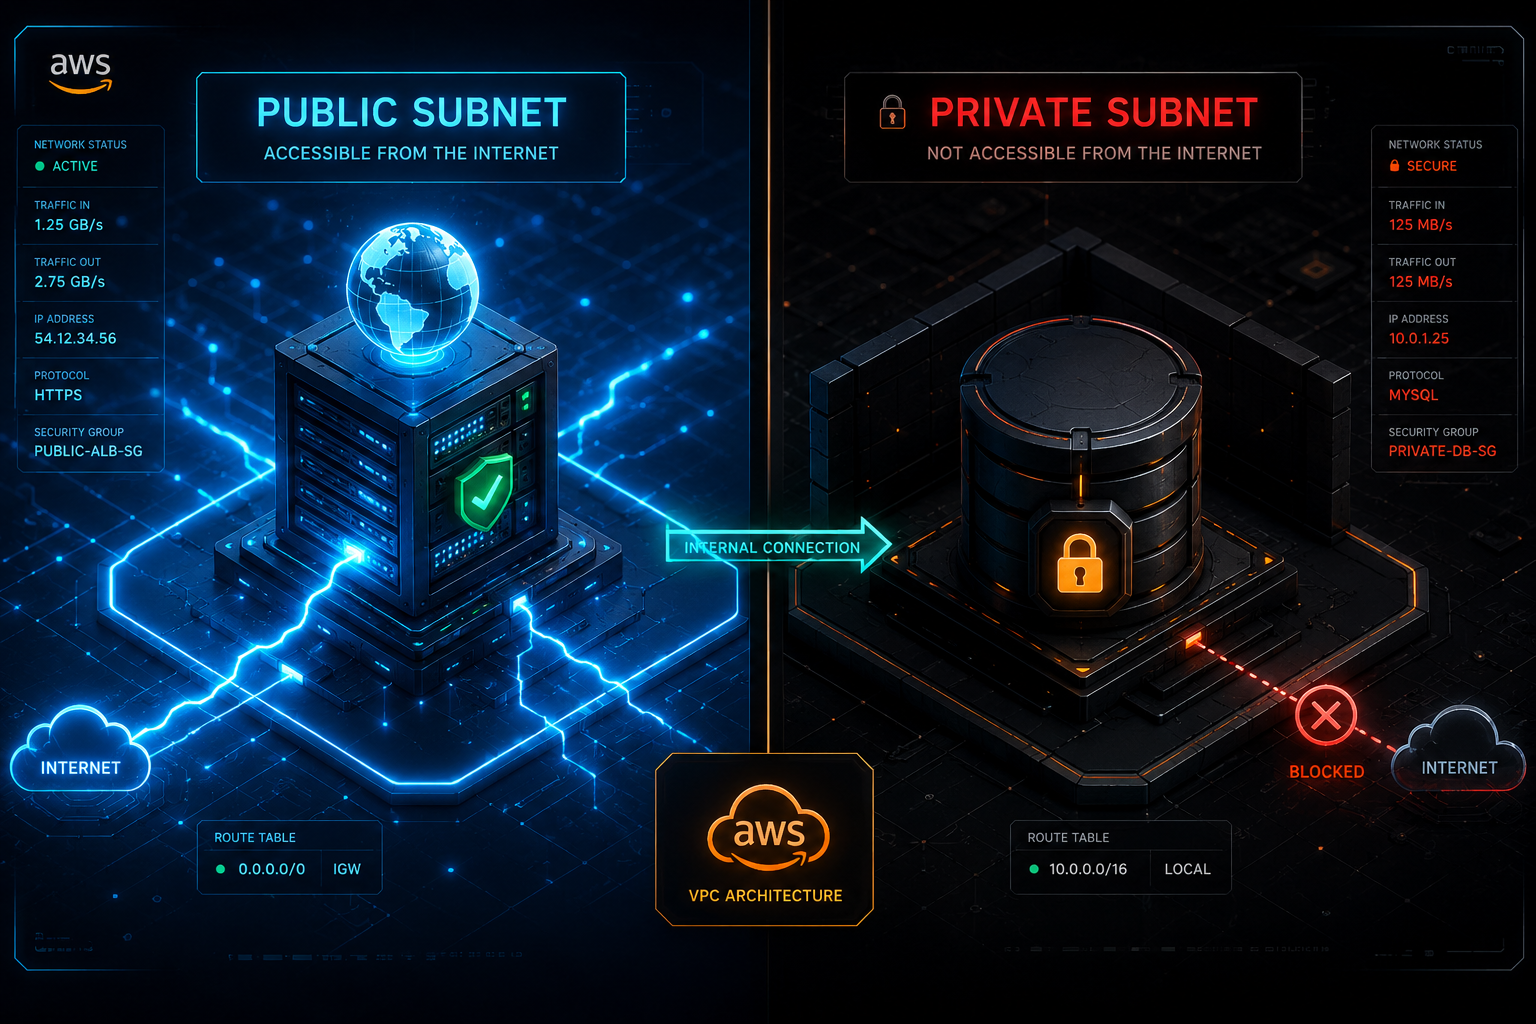
🌍 Public Subnet
A public subnet is a subnet whose traffic is routed to an Internet Gateway. Resources inside a public subnet can:
- Receive incoming traffic from the internet
- Send outgoing traffic to the internet
- Be assigned a public IP address
What lives in a public subnet?
- Web servers (Nginx, Apache)
- Load balancers
- Bastion hosts (jump servers)
- NAT Gateways
In our project, we set map_public_ip_on_launch = true on the public subnet. This means any EC2 instance you launch here automatically gets a public IP address — you do not have to assign one manually.
Public Subnet (10.0.1.0/24)
├── Has a Route to Internet Gateway ✅
├── map_public_ip_on_launch = true ✅
└── Resources here ARE reachable from internet ✅
🔒 Private Subnet
A private subnet has no route to an Internet Gateway. Resources inside it:
- Cannot be reached directly from the internet
- Cannot reach the internet on their own (unless a NAT Gateway is added)
- Are only accessible from within the VPC
What lives in a private subnet?
- Databases (RDS, MongoDB)
- Application servers
- Internal microservices
- Cache layers (ElastiCache)
In our project, the private subnet has no Internet Gateway route and no public IP assignment — making it completely isolated from the public internet.
Private Subnet (10.0.2.0/24)
├── No Route to Internet Gateway ❌
├── map_public_ip_on_launch = false ❌
└── Resources here are NOT reachable from internet ✅
Side-by-Side Comparison
| Feature | Public Subnet | Private Subnet |
|---|---|---|
| Internet Access | ✅ Yes | ❌ No |
| Has Route to IGW | ✅ Yes | ❌ No |
| Auto Public IP | ✅ Yes (if enabled) | ❌ No |
| Use Case | Web servers, Load balancers | Databases, App servers |
| Security Level | Moderate | High |
| CIDR (our project) | 10.0.1.0/24 |
10.0.2.0/24 |
🔐 Security principle: Never put your database in a public subnet. Ever. Always keep sensitive resources in a private subnet.
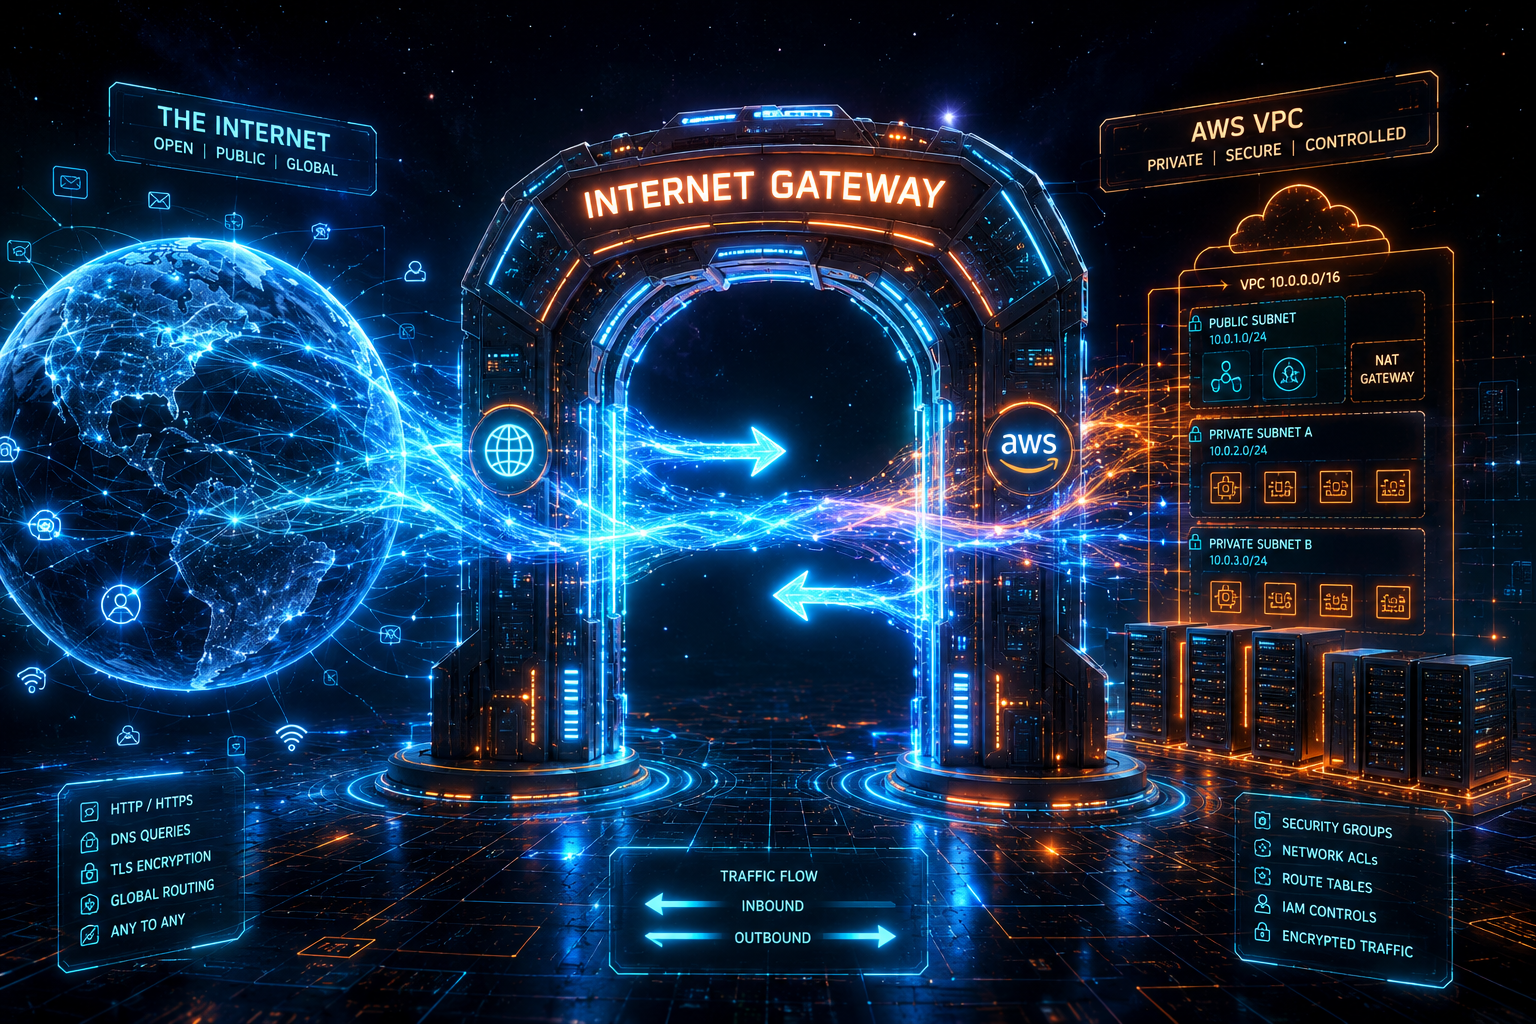
7. What is an Internet Gateway?
An Internet Gateway (IGW) is the component that connects your VPC to the internet.
Without an Internet Gateway, your VPC is completely cut off from the outside world. It is like having a building with no doors to the street.
🚪 Think of the Internet Gateway as the main entrance door of your private office building. It is the only way in and out for internet traffic.
Key facts about Internet Gateways:
- One VPC can only have one Internet Gateway
- It is horizontally scaled, redundant, and highly available by default
- It does not limit bandwidth
- It is free — you only pay for data transfer, not the IGW itself
- Attaching it to the VPC is not enough — you must also add a route in the Route Table
In our project, we create one IGW named ecommerce-igw and attach it to ecommerce-vpc:
Internet Gateway: ecommerce-igw
└── Attached to: ecommerce-vpc ✅
└── Referenced in: Route Table (0.0.0.0/0 → ecommerce-igw)
⚠️ Common mistake: Many beginners create an Internet Gateway and attach it to the VPC — then wonder why their EC2 instance still has no internet. The reason is they forgot to add the IGW to the Route Table. We cover this next.
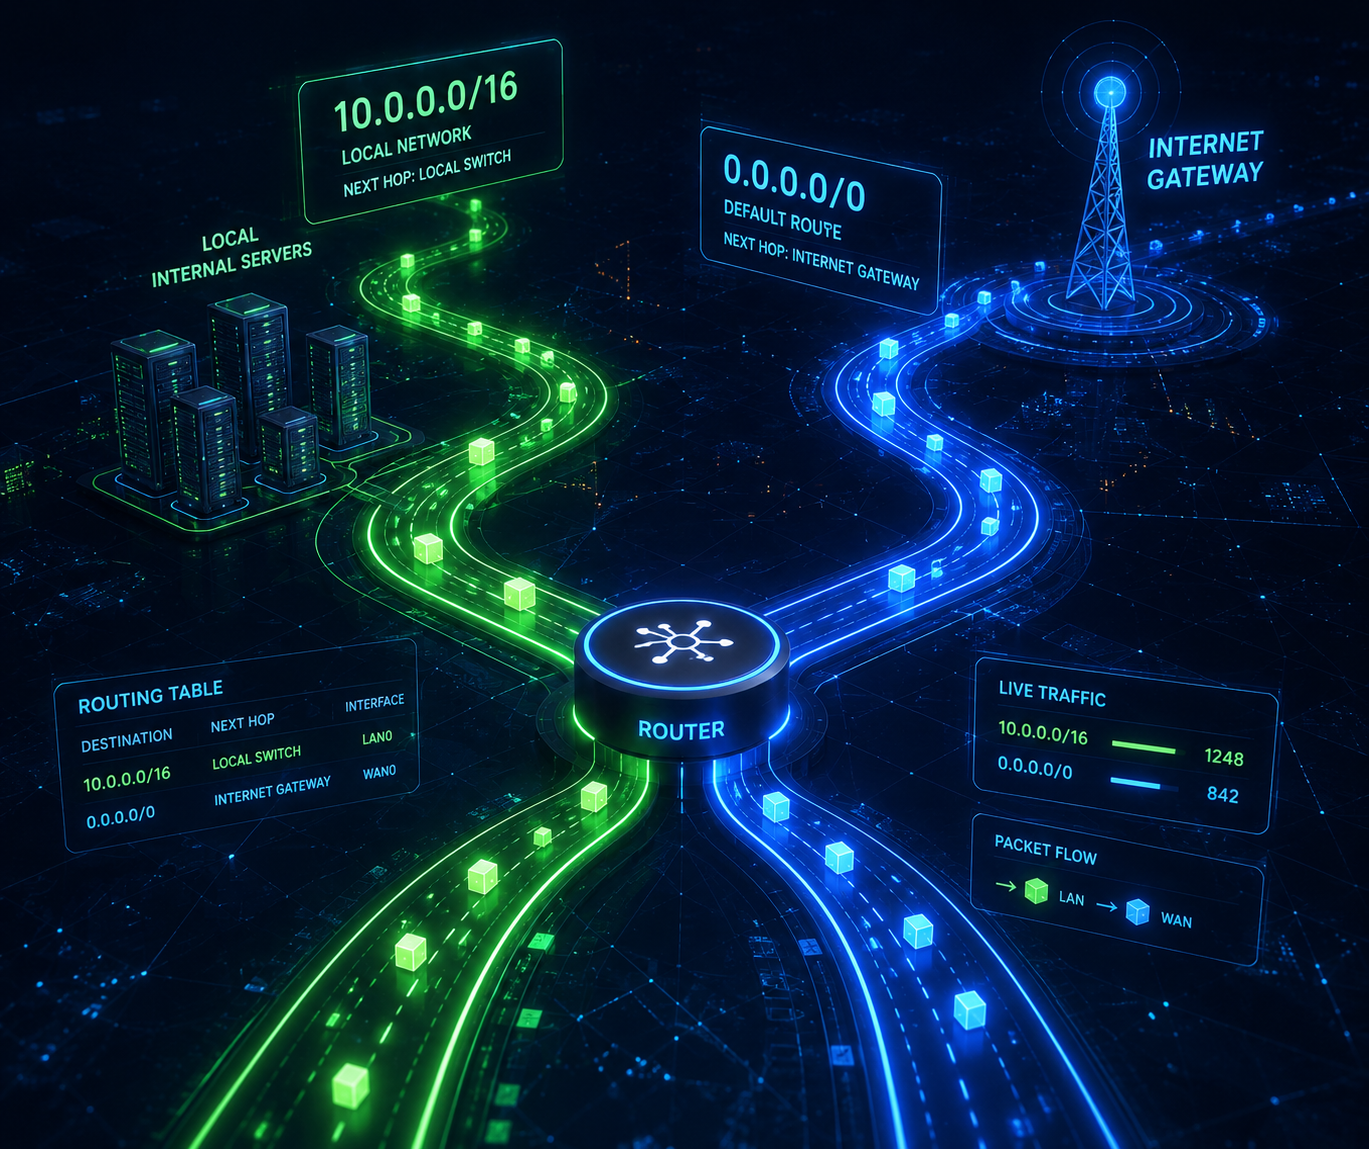
8. What is a Route Table?
A Route Table is a set of rules — called routes — that tell network traffic where to go.
Every subnet in your VPC is associated with a Route Table. The Route Table looks at each packet of data and asks: “Where should this go?”
🗺️ Think of a Route Table as a GPS system for your network traffic. You tell it: “If traffic is going to the internet, send it through the Internet Gateway.”
How Routes Work
A route has two parts:
| Part | Description | Example |
|---|---|---|
| Destination | Where is the traffic going? | 0.0.0.0/0 (anywhere) |
| Target | What should handle this traffic? | igw-xxxxxxxx (Internet Gateway) |
The Two Routes in Our Route Table
Our ecommerce-public-rtb has these routes:
| Destination | Target | Added By | Meaning |
|---|---|---|---|
10.0.0.0/16 |
local |
AWS (automatic) | Traffic inside the VPC stays inside |
0.0.0.0/0 |
ecommerce-igw |
Us (manual) | All other traffic goes to the internet |
The local route is automatically added by AWS when you create the VPC. You never have to touch it.
The 0.0.0.0/0 → IGW route is the one we add manually to enable internet access.
What 0.0.0.0/0 Means
0.0.0.0/0 means “match everything” — any IP address, anywhere in the world. It is the catch-all rule.
So the route table logic works like this:
Packet arrives. Where is it going?

  → Is it going to 10.0.0.0/16? (somewhere inside our VPC)
    → YES: Send it through "local" (internal routing) ✅

  → Is it going somewhere else? (the internet)
    → YES: Send it to the Internet Gateway ✅
9. How Everything Connects Together
Now let us zoom out and see the complete picture of how all components work together:
🌍 Internet
     │
     │  (User types your website URL)
     │
     ▼
┌─────────────────────────┐
│    Internet Gateway     │  ← The door between internet and your VPC
│      ecommerce-igw      │
└────────────┬────────────┘
             │
             │  (IGW forwards traffic into the VPC)
             │
┌────────────▼────────────┐
│       Route Table        │  ← Checks: where should this traffic go?
│   ecommerce-public-rtb   │
│  0.0.0.0/0 → ecommerce-igw │
└────────────┬────────────┘
             │
             │  (Route Table says: send to public subnet)
             │
┌────────────▼──────────────────────────────────────────┐
│                  VPC — ecommerce-vpc                  │
│                    10.0.0.0/16                        │
│                                                       │
│  ┌──────────────────────┐  ┌─────────────────────┐   │
│  │    Public Subnet     │  │   Private Subnet     │   │
│  │    10.0.1.0/24       │  │    10.0.2.0/24       │   │
│  │                      │  │                      │   │
│  │  🖥️ Web Server       │  │  🗄️ Database         │   │
│  │  (Public IP: ✅)      │  │  (Public IP: ❌)     │   │
│  │                      │  │                      │   │
│  │  Reachable from      │  │  NOT reachable       │   │
│  │  internet ✅          │  │  from internet ✅    │   │
│  └──────────────────────┘  └─────────────────────┘   │
└───────────────────────────────────────────────────────┘
The traffic flow for a user visiting your website:
- User types
www.yourstore.comin their browser - DNS resolves to your EC2 public IP in the public subnet
- Request travels through the Internet Gateway
- Route Table checks the rules — routes traffic to the public subnet
- Web server in the public subnet receives and processes the request
- Web server talks to the database in the private subnet (internal VPC traffic via
localroute) - Database returns data to web server
- Web server sends response back to user through the same path
The private subnet database is never directly exposed to the internet — only the web server in the public subnet communicates with it, from inside the VPC.
10. Step-by-Step: Create Your Own VPC on AWS
Now let us build this hands-on in the AWS Console — no code required.
Step 1 — Sign in to AWS Console
Go to https://console.aws.amazon.com and sign in. Make sure you are in the correct region. For this guide, we use US East (Ohio) — us-east-2.
💡 Always check your region in the top-right corner of the AWS Console before creating resources.
Step 2 — Create the VPC
- In the search bar, type VPC and click on it
- In the left sidebar, click Your VPCs
- Click the orange Create VPC button
- Fill in the details:
| Field | Value |
|---|---|
| Name tag | ecommerce-vpc |
| IPv4 CIDR block | 10.0.0.0/16 |
| IPv6 CIDR block | No IPv6 CIDR block |
| Tenancy | Default |
- Click Create VPC
✅ Your VPC is created. You will see it listed with a VPC ID like vpc-0abc123...
Step 3 — Create the Public Subnet
- In the left sidebar, click Subnets
- Click Create subnet
- Select your VPC:
ecommerce-vpc - Fill in subnet details:
| Field | Value |
|---|---|
| Subnet name | ecommerce-public-subnet |
| Availability Zone | us-east-2a |
| IPv4 CIDR block | 10.0.1.0/24 |
- Click Create subnet
Enable Auto-assign Public IP:
After creation, select ecommerce-public-subnet → click Actions → Edit subnet settings → check Enable auto-assign public IPv4 address → Save.
✅ Your public subnet is ready. Any EC2 launched here will get a public IP automatically.
Step 4 — Create the Private Subnet
- Click Create subnet again
- Select your VPC:
ecommerce-vpc - Fill in subnet details:
| Field | Value |
|---|---|
| Subnet name | ecommerce-private-subnet |
| Availability Zone | us-east-2a |
| IPv4 CIDR block | 10.0.2.0/24 |
- Click Create subnet
⚠️ Do NOT enable auto-assign public IP on this subnet. Leave it disabled — this subnet must stay private.
✅ Your private subnet is ready. It has no internet access — exactly what we want.
Step 5 — Create the Internet Gateway
- In the left sidebar, click Internet Gateways
- Click Create internet gateway
- Fill in the details:
| Field | Value |
|---|---|
| Name tag | ecommerce-igw |
- Click Create internet gateway
Attach the IGW to your VPC:
After creation, you will see a green banner saying “Attach to a VPC”. Click it — or go to Actions → Attach to VPC → select ecommerce-vpc → click Attach internet gateway.
✅ The IGW now says “Attached” next to ecommerce-vpc. But wait — this alone does not give internet access. You still need the Route Table.
Step 6 — Create the Route Table
- In the left sidebar, click Route Tables
- Click Create route table
- Fill in the details:
| Field | Value |
|---|---|
| Name | ecommerce-public-rtb |
| VPC | ecommerce-vpc |
- Click Create route table
Add a route to the Internet Gateway:
After creation, select ecommerce-public-rtb → click the Routes tab → click Edit routes → click Add route:
| Field | Value |
|---|---|
| Destination | 0.0.0.0/0 |
| Target | Internet Gateway → ecommerce-igw |
Click Save changes.
✅ The route table now knows: “Send all internet-bound traffic to the IGW.”
Step 7 — Associate the Route Table with the Public Subnet
Creating the Route Table is not enough — you must link it to the public subnet.
- Select
ecommerce-public-rtb - Click the Subnet associations tab
- Click Edit subnet associations
- Check
ecommerce-public-subnet - Click Save associations
✅ Done! The public subnet is now associated with the route table that has internet access.
🔑 Key insight: The private subnet deliberately has NO association with this route table. It stays associated with the default VPC route table which only has the
localroute — meaning no internet access.
Step 8 — Verify Your Setup
Here is a quick checklist to confirm everything is correctly configured:
| Resource | Name | Status |
|---|---|---|
| VPC | ecommerce-vpc (10.0.0.0/16) |
✅ Created |
| Public Subnet | ecommerce-public-subnet (10.0.1.0/24) |
✅ Public IP enabled |
| Private Subnet | ecommerce-private-subnet (10.0.2.0/24) |
✅ No public IP |
| Internet Gateway | ecommerce-igw |
✅ Attached to VPC |
| Route Table | ecommerce-public-rtb |
✅ Route 0.0.0.0/0 → IGW |
| Route Table Association | Public subnet linked | ✅ Associated |
Your VPC architecture is complete! 🎉
11. Common Mistakes Beginners Make
These are the top mistakes that cause frustration — now you know to avoid them:
❌ Mistake 1: Creating an IGW but not adding it to the Route Table
Creating an Internet Gateway and attaching it to the VPC does not automatically give internet access. You must add 0.0.0.0/0 → IGW as a route in your Route Table. This trips up almost every beginner.
❌ Mistake 2: Creating a Route Table but forgetting to associate it with the subnet
A Route Table with all the right rules does nothing if it is not associated with a subnet. The subnet will keep using the default route table.
❌ Mistake 3: Not enabling auto-assign public IP on the public subnet
You create an EC2 in the public subnet but it has no public IP — so you cannot reach it. Always enable map_public_ip_on_launch on public subnets (or assign an Elastic IP manually).
❌ Mistake 4: Putting the database in the public subnet
This is a serious security mistake. Databases should always go in the private subnet. They only need to communicate with your application server — not the internet.
❌ Mistake 5: Using overlapping CIDR blocks
Your subnets cannot have overlapping IP ranges. 10.0.1.0/24 and 10.0.1.128/24 would overlap. Always plan your CIDR ranges before creating subnets.
12. Learning Outcomes
After reading this guide, you now understand:
- ✅ What AWS VPC is and why every production application needs one
- ✅ How CIDR blocks define IP address ranges for networks
- ✅ The difference between a public subnet and a private subnet
- ✅ What an Internet Gateway is and why it is not enough on its own
- ✅ How Route Tables direct traffic within and outside a VPC
- ✅ Why Route Table Association is the final step that makes it all work
- ✅ How to build a complete VPC from scratch in the AWS Console
- ✅ The most common mistakes beginners make — and how to avoid them
13. What to Learn Next
Now that you have a solid VPC foundation, here is your recommended learning path:
| Topic | What You Will Learn | Difficulty |
|---|---|---|
| 🔄 NAT Gateway | Give private subnets outbound internet access (for updates/patches) | Beginner |
| 🔐 Security Groups | Instance-level firewall rules (inbound/outbound) | Beginner |
| 🛡️ Network ACLs | Subnet-level stateless firewall rules | Intermediate |
| 🖥️ EC2 in VPC | Launch servers inside your public and private subnets | Beginner |
| 🌍 Multi-AZ Architecture | Spread subnets across Availability Zones for high availability | Intermediate |
| ⚖️ Load Balancer (ALB) | Distribute traffic across multiple EC2 instances | Intermediate |
| 🔌 VPC Peering | Connect two VPCs together privately | Advanced |
| 📦 Terraform + VPC | Automate this entire setup with Infrastructure as Code | Intermediate |
Final Thoughts
AWS VPC is the single most important networking concept in cloud computing. Every other AWS service — EC2, RDS, ECS, Lambda in VPC — depends on it.
The good news is: once you understand the relationship between VPC → Subnets → Internet Gateway → Route Tables, everything else in AWS networking starts to make sense.
You have built the foundation. Keep building. 🚀